


Every
hunter’s most important tool
is his gun. If the gun goes bad so does the hunter. There are simple
steps that
one can take to prevent your gun from rusting, misfiring, or becoming
inaccurate.
Right
after Shooting: When a hunt or
target shooting session is over, never place a damp gun in a case. That
includes moisture from rain or perspiration. The case protects a gun
from
damage, but if moisture is on the gun when it is stored in the case, it
will
rust swiftly and severely. Dry the gun with a cloth and then wipe down
with an
oily cloth to protect the finish.
Scrub the Barrel: Cleaning
you gun after shooting isn’t just running an oily
patch through it. You need to get a phosphor-bronze brush and scrub the
entire
bore thoroughly. Next, you need to run some patches with powder solvent
through
the barrel. Repeat those steps until the gun is clean (you can tell the
difference). Then run an oily patch through the bore for storage.
Remove Rust: Rust
can ruin a gun if it gets out of hand. To prevent
this, scrub the rust with some 0000 steel wool and a little oil. If it
is the
trigger that is rusted; I would advise you to go to a gunsmith.
Replace Burred Screws:
Burred Screws can make adjustments to the gun
more difficult than they need to be. Most burred screws can be removed
before
they are too burred to remove (If you can’t remove them, you will have
to go to
a gunsmith.). To get replacement screws, go to a gunsmith or you can
most
likely order them online at from the manufacturer.
Reblue Unblue Areas:
You might consider those unblue spots to be the
times you and your gun have been together, but those spots are the most
likely
to become rusted. To fix it, get some gun blue from either a hunting
retailer
or online.
Clean Your Scope:
Make sure that you clean the lenses regularly with
camera lens or glasses cleaner. Clean the body with a dry cloth.

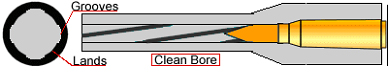
A rifle gets its name from the presence of spiral lands and grooves in the bore called "rifling." The bullet is forced into the rifling when the cartridge is fired which engraves and spin the bullet, thereby increasing the rifle's projectile range and accuracy.
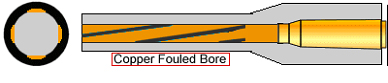
Once you have fired a round through the barrel it will begin filling the bore with copper and powder fouling, after 5 - 10 rounds through the average hunting rifle, accuracy will start to deteriorate.

Between 10 - 20 rounds enough copper and powder fouling has accumulated in the lands and grooves of the bore to change its true bore diameter. It is at this point where bullets are barely being gripped by the rifling and accuracy is a total failure.
Believe it or not the average centerfire hunting rifle you buy today is very capable of extreme accuracy when shot in and cleaned correctly to help reduce barrel fouling.
You may be sitting there reading this thinking your rifle is shot in and the bore is clean, unless you have used a copper solvent in the bore I can assure you that neither are true.
You may have heard the term of a barrel being shot in and it took x amount of rounds to do so. Well, correctly, it would be called barrel break-in, of which all rifles need from the time they are purchased and which almost all are never done correctly.
The reason you need to break in a barrel is to help smooth out or burnish the bore which slows the accuracy robbing fouling process.
To properly break in a barrel for top notch accuracy whether the gun is new or used is this; 1.
20 rounds of ammunition,
2. Copper solvent,
3. Powder solvent,
4. Cleaning kit.
Make sure that the barrel is clean and fire one round, now clean the bore using your copper and powder solvents until the bore is perfectly clean again, repeat this exact process for twenty rounds.
The roughest part of the bore will accumulate copper after only one round any more rounds than one and your only adding copper on top of copper so it is important not to shortcut this process. At the end of this process your rifle bore will finally be broke in correctly.
Note: It is not uncommon for a cold, clean, hunting rifle after this process has been followed precisely with the right ammunition to shoot one ragged hole 3 - 5 shot groups at 100 yards.

What does the rifling twist rate do
The rate of rifling twist determines the optimum bullet weight for a given caliber and speed of the bullet by applying the proper spin on the bullet to prevent the bullet form yawing and pitching.
Expressed in terms of the number of revolutions per inch of barrel length, this ratio is commonly expressed by designations such as 1:10, 1/10 or 1 in 10 twist, the 1 represents 1 twist, the 10 represents inches of barrel length.
So, a 1 in 10 twist is, 1 complete bullet revolution every 10 inches of barrel length traveled.
How do you know what rifling twist is right
A good rule of thumb is that the heavier and longer a bullet is, the faster the rifling twist rate needs to be to stabilize it in flight, therefore a lighter shorter bullet needs a slower rifling twist rate to give proper bullet spin for correct flight.
Exception to the rule
If an insufficient twist rate is used, the bullet will begin to yaw and then tumble; this is usually seen as "keyholing", where bullets leave elongated holes in the target as they strike at an angle.
Once the bullet starts to yaw, any hope of accuracy is lost, as the bullet will begin to veer off in random directions.
A too-high rate of twist can also cause problems. The excessive twist can cause accelerated barrel wear, and in high velocity bullets an excessive twist can cause bullets to literally tear themselves apart under the centrifugal force.
Choosing the right rifle
When choosing a rifle cartridge you should always evaluate what you are going to use the rifle for and then select the rifle with the correct rifling twist rate for your imparticular use by bullet weight to gain the most accuracy.
Measuring the rifling twist rate in a rifle barrel.
To measure the twist of a barrel, use a cleaning rod, magic marker and a tight patch.
1. Make a straight line with the magic marker the length of your cleaning rod.
2. Start the patch down the barrel, stop and mark the rod at the muzzle and a mark on the muzzle.
3. Push in the rod slowly until it has made one revolution, this is verified when the line on the rod lines up with the mark on the muzzle, then make a second mark on the rod at the muzzle.
4. The distance between marks on the rod is the rifling twist rate in your barrel.
How to properly sight in a rifle.
1. This first thing to know in rifle sighting in is that all rifle sighting systems give you a point of aim on any target.
2. The second thing to know in rifle sighting in is that all rifle sighting systems compensate bullet or projectile drop.
3. The third thing to know in rifle sighting in is that a bullet constantly drops once leaving the rifle barrel, the arc that it drops in is the bullet trajectory.
Four terms to know when properly sighting in a rifle.
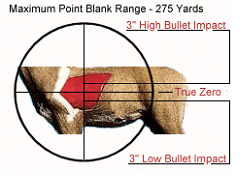
1. Point Blank Range; Point blank range when sighting in a rifle is the first point at which the line of sight intersects with the bullets path in the bullets trajectory arc.
2. Mid-Range Rise; Mid-range rise when sighting in a rifle is the highest point in the bullets trajectory between the point blank range and the true zero point.
3. True Zero; True zero when sighting in a rifle is the second point at which the line of sight intersects with the bullets path in the bullets trajectory arc.
4. Maximum Point Blank Range; Maximum point blank range when sighting in a rifle is the height of the mid-range rise and the bullet drop beyond true zero, both are equal in measure.

Note: Before sighting in your rifle you need to know how far above or below true zero you will still be able to hit and kill what ever you are hunting, with a dead on hold, varmint rifles typically are 1 1/2", deer under 150 lbs. 2 1/2", deer over 150 lbs. 3" and elk 3 1/2".
This method of rifle sight in is universal for any rifle type, sighting system, caliber and or cartridge. I will explain why at each step of the rifle sighting in process.
1. At exactly 50 yards put up a target that you can clearly see with your sight system.
a. For a air-rifle of reasonable power, 50 yards will most likely be the furthest maximum point blank range in the trajectory path for sighting in purposes.
b. For a rimfire rifle, 50 yards will most likely be the true zero point in the trajectory path for sighting in purposes.
c. For a muzzleloading rifle, 50 yards will most likely be the mid range rise in the trajectory path for sighting in purposes.
d. For a centerfire rifle, 50 yards will most likely be the point blank range in the trajectory path for sighting in purposes.
2. Now with your rifle properly rested on a rifle rest on top of a solid shooting bench, slowly and methodically fire three precise rounds.
3. Make an exact measurement from the center of your group to the center of your target make your windage adjustment accordingly, if you need to go left or right and you have windage adjustable scope bases, use the windage screws on the base, not the scope, rule of thumb for windage adjustment, if your bullet impact is to the left side of target loosen the right rear windage screw on the base and tighten the windage screw on the left rear side of the base.
4. Fire three more rounds to confirm your setting, if all is well and you have centered your group move on to step 5. If you are not satisfied with the accuracy of your ammunition at this point go no further until you have the ammunition you are happy with.
5. Depending on your rifle scope this is all you will be able to accurately do for this range outing, there are a lot of rifle scopes that do not like windage and elevation adjustments all at the same time. Any attempt to keep shooting with one of these scopes will only waste ammo and aggravate you to the point of despair.
6. Establishing a reference zero.
a. Low powered air-rifles and small .22 rimfires, at exactly 50 yards zero your rifle.
b. More powerful rimfires move out to exactly 75 yards and zero your rifle.
c. 30/30 trajectory class centerfire rifles and muzzleloading rifles move out to exactly 100 yards and zero your rifle.
d. High powered rifles move out to 100 yards and make sure your rifle is still center and a little high and then move on out to 200 yards and zero your rifle.
7. Trajectory plotting your rifle and ammunition combination for proper sight in.
Class a and b rifles take your target and move it closer to you, firing 3 shot groups in 10 yard increments, mark the range on the target at each shot group.
Class c and d rifles take your target and move it closer to you, firing 3 shot groups in 25 yard increments, mark the range on the target at each shot group.
a. Continue moving the target closer to you until one group of shots emerges as the highest, this is confirmed when the next target move closer to you the grouping is lower.
b. Congratulations riflemen at this point of the rifle sighting in procedure you have now established a true zero point and more importantly you have found the mid-range rise for your rifle, scope mounting, and ammunition selection.
c. Now measure the center of your highest group on your target to your zero point, this is your true mid-range rise.
d. Is this acceptable, or does it need to be adjusted for more or less rise.
d. part 1. If the mid-range rise is to much, class a & b rifles move your target 10 yards closer, class c & d rifles move your target 25 yards closer to you from your original zero yardage and re-zero your rifle. Then repeat step 7 of the rifle sight-in procedure again.
d. part 2. If the mid-range rise is not enough, class a & b rifles move your target 10 yards further, class c & d rifles move your target 25 yards further from your original zero yardage and re-zero your rifle. Then repeat step 7 of the rifle sight-in procedure again.
Note: Repeat this procedure till you have exactly what you want.
8.
Establishing your rifles maximum point blank
range.
Now that you have established your mid-range rise and your
true zero,
it's time for the final step in properly sighting in your rifle
(M.P.B.R.).
Class a and b rifles take your target and move it from your true zero point further from you, firing 3 shot groups in 10 yard increments, mark the range on the target at each shot group.
Class c and d rifles take your target and move it from your true zero point further from you, firing 3 shot groups in 25 yard increments, mark the range on the target at each shot group.
a.
Continue moving the target further from you
until one group of shots emerges as the same distance low as your
mid-range
high.
Note: Example 2" high, 2" low.
b. Congratulations riflemen at this point of the rifle sighting in procedure you have now established a true zero point, you have found the mid-range rise and you have found your true maximum point blank range for your rifle, scope mounting, and ammunition selection.
Your Rifle Is Now Properly Sighted-In.
This is the only way to properly and accurately sight in a rifle.
We will start from scratch here. A brand new remington 700 bolt action rifle, millett 2 piece windage adjustable scope bases, millett scope rings and a leupold 3-9 variable power scope. Fairly common hunting rig.
Now lets mount the scope the right way to achieve its full accuracy potential.
Note: If you follow this scope mounting procedure exactly it will be impossible to cant the scope.
1. Mount the rifle in a padded vise as far away from a wall opposing the muzzle end of the rifle, the farther away the better.
2. Attach the scope mount base to the rifle securely.
3. Now take a level and lay it on the base horizontal to the rifle bore. Level the rig out in the vise and lock it down.

4. Attach the scope rings, make sure the scope will lay down into the rings without them moving when you go to tighten the scope into the rings.
5. Now take the scope and put it between 2 v blocks and spin the scope watching the crosshairs for wobble, adjust the scope to insure there is no wobble in the crosshairs, this is critical to your accuracy.
6. Check to make sure that your rig is still level in the vise and then set the scope in the rings.
7. On the opposing wall away from the rifle muzzle draw a vertical and horizontal line, again using a level to insure that the line is plumb vertically and level horizontally. It should look like a plus sign.
8.
Remove the bolt from the rifle, looking through
the rifles bore, center the plus sign in it.
Note: If you can't remove the bolt use a laser chamber
boresighter only.
9. Do Not Use The Windage Screws On The Scope For This Procedure.
Align the vertical post in the scope with the vertical line on the wall using only the windage screws on the scope base and tighten down the scope rings, make sure that all stay level and plumb vertically and horizontally.
10. If you have done everything correctly, you have just mounted the scope to all the exact tolerances that have been machined into all the scope mount components. Everything to its true and exact mechanical center point.
11. Your rifles scope is now properly mounted and is range ready for a true sight-in, if you have followed this method of scope mounting use my method to properly sight in your rifle. Go to the rifle shooting section.