


1. Clean and Check cases before
reloading.
Using a soft cloth, wipe each case clean to prevent dirt from
scratching
the case. Inspect the case for split case mouths, case head
separations,
excessive bulges and other case defects.
Any case found defective should be thrown away and not
reloaded.
2. Lubricate the Cases.
(a.) Spread some lube on a lube pad and lubricate the body of the case.
(b.) Clean dirt and powder residue from inside case necks and
simultaneously add a light coating of case lube with a case neck brush.
Roll
the brush across the lube pad after every three or four cases for just
the
right amount.
3. Insert the Case.
With the press handle in the uppermost position slide the
case into the
shell holder.
4. Resize and deprime the Case.
Gently but firmly lower the press handle all the way to the
bottom and
run the case all the way into the sizer die. This will resize the case
to the
proper dimension and push the fired primer out of the case. Then, raise
the
press handle.
5. Check the Case Length and Trim
if
Necessary.
After several firings, cases stretch and become longer than
the specified
maximum length. These cases must be trimmed to allow for proper
chambering.
6. Chamfer and Deburr.
Cases that have been trimmed need to also be chamfered and
deburred.
7. Priming the Case.
(a.) Place a fresh primer, anvil side
up, into the cup of the primer arm and insert a case into the shell
holder.
(b.) Lower the handle and push the primer arm all the way into the slot
in the shell holder ram.
(c.) Now, gently and slowly raise the press handle. As the case is
drawn
out of the die it will be lowered onto the fresh primer which will be
seated
into the primer pocket. Slightly lower the press handle to release the
primer
arm; then push the handle all the way up. Inspect the primer to make
sure it is
properly seated.
8. Charging the casing with
powder.
(a.) Consult a Reloading Manual to learn
what kind of powder, and exactly how much is recommended to reload your
cartridge. Then weigh the recommended charge on your scale.
(b.) After accurately weighing the powder charge, put it into the case
using a powder funnel.
9. Bullet Seating.
(a.) Thread the seater die a few turns
into the press. Put a case in the shell holder and lower the press
handle,
running the ram with the case to the top of the press stroke. Turn the
die body
down until it stops. The crimp shoulder in the die is now pressing
against the
top of the case mouth. Back the die out one turn, raising the crimp
shoulder
above the case mouth. Secure the die in position with the die lock
ring.
(b.) Next, unscrew the seater plug enough to keep the bullet from being
seated too deeply.
(c.) With the handle in the uppermost position insert a properly primed
and charged case into the shell holder.
(d.) Take a bullet and hold it over the case mouth with one hand while
you lower the press handle with the other, easing the case and the
bullet up
into the die. After raising the handle, note the seating depth of the
loaded
round. If the bullet needs to be seated deeper into the case, turn the
seater
plug down.
(e.) Run the loaded round back up into the die, raise the press handle
and check the seating depth again. A few more adjustments may be needed
for the
proper bullet seating depth; then, you simply tighten the small seater
plug
lock ring.
10. That's it!
Your first reloaded cartridge is ready to be fired..
Brass
/ Cartridge Case
The cartridge case is the one component in reloading that is
so generally
passed over when looking for accuracy, when in fact it is one of the
most
critical for accuracy. It is the cartridge case that has to hold the
bullet in
perfect alignment with the rifles bore, any deviation here and accuracy
will
suffer.
The first rule when it comes to cartridge cases is never mix cases from different manufacturers or even same manufacturer with different lot numbers or batch run. If you really are looking for accuracy loads, bulk brass is cheap so when ordering order a minimum of 100 cartridge cases before standardizing cases.
Weighing
Cartridge Cases.
1. The first step in standardizing cartridge cases is weighing
each and every one and then separating them by weight, separate in 1
grain
increments or less.
a. If there is even 1/10 of a grain difference in weight between the cases that means there is a difference in the internal dimension and strength structure of the case. This will change stress expansion areas of the case which in turn will change the way the cartridge head spaces in the rifle chamber when it is fired.
Each time the cases are loaded and fired the heavier cases will stretch less between the cases shoulder and head than the lighter ones. Evidence of this can be noted by measuring case length after firing the cartridges, they simply do not stretch the same and this does affect accuracy.
b. The cartridge case capacity is directly affected which is nothing more than the volume of the cartridge case but of which in turn affects velocity hi-lo spread and will affect bullet impact or accuracy.
Electronic
Scale
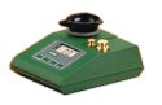 Digital Scale With a 1500 grain capacity, you
can weigh powder, bullets and
Digital Scale With a 1500 grain capacity, you
can weigh powder, bullets and
cartridge cases with complete accuracy to within 0.1 of a grain
quickly.
Case
Neck Thickness
2. The one case dimension that really helps shrink group spread is
uniform neck thickness. Ideally, necks shouldn't vary more than .0015"
in
thickness. Before measuring, bulk brass should be run through with an
expander
ball to remove dents (resizing die with expander ball).
All cartridge cases should be checked for this condition after every third loading because brass flows forward and will thicken the cartridge cases neck.
Case
Neck Thickness Gauge
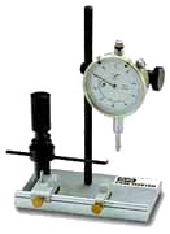 How the complete cartridge
fits in the chamber and throat of the rifle barrel
directly affects accuracy!
How the complete cartridge
fits in the chamber and throat of the rifle barrel
directly affects accuracy!
A quick, way to determine several important case and cartridge
dimensions is
using a gauging tool.
It measures
case
neck concentricity,
case neck thickness,
case
length and
bullet
run-out.
Primers
Primers directly affect accuracy more than most people or
reloaders
realize. The primer is the only component in a cartridge that sets off
a chain
reaction of events. The first thing that the primer does is start the
bullet
moving out of the cartridge case and at the same time it ignites the
powder
charge which in turn pushes the bullet out of the barrel.
Some of the things that can dictate a certain primer usage are extremely hard or soft bullets, bullet seating depth, powder selection by burn rate and or amounts of powder used in the case.
Rifle primers are not the same by any means, there is a difference in the length of time which primers burn. Primers can be selected by heat or pressure range of which there are three.
Always keep in mind that between class a and class c primers there can be a hi-lo pressure difference of approximately 12%, if working at the high end of a cartridges pressure if you change primers change the powder charge as well.
1. Large Rifle Primers
Class A Large Rifle: Federal 210, Remington 9 1/2 primers will generate about 6% less pressure than class b primers and are well suited for faster igniting rifle powders like IMR 3031.
Class B Large Rifle: CCI 200 primers are well suited for medium range burning rifle powders like IMR 4320.
Class C Large Rifle: CCI 250, Federal 215 primers will generate about 6% more pressure than class b primers and are well suited for slower burning rifle powders like IMR 4350.
Note: Small rifle primers do not have a great a heat range variance as do large rifle primers but there are still three different pressure levels or heat ranges.
2. Small Rifle Primers
Class A Small Rifle: Remington 6 1/2
Class B Small Rifle: CCI 400
Class C Small Rifle: Federal 205
Just remember when it comes to custom hand loading of rifle cartridges there is nothing cast in stone, it is all a matter of trial and error for each individual rifle.
Powder
There are many rifle cartridge powders to choose from for the
avid
reloader today each of which vary in their burn rate. With all the
powders that
are available how does anyone know which powder to select for their
particular
rifle cartridge reloading.
Load
Density
Load density is the determining factor in selecting powder
for a
particular rifle cartridge with 86% density just about ideal in most
cases.
Load density is the ratio between case capacity and actual powder
charge. Most
factory ammunition is loaded with a density of 80% - 90% of the
cartridge case
capacity.
1. You
should never exceed 95% load density.
a. Primers need room to flame through the powder charge which gives
uniform velocity and pressure.
b. Cases that are full or compressed charges of powder will accelerate
barrel wear in the rifle barrels throat area.
2. You
should never drop to far below 80% load density.
A known condition named detonation (excess pressure spike)
can occur with
cases that are not significantly filled with powder. Some years ago the
U.S.
Ordnance and DuPont ballistics laboratories were able to duplicate the
strange
phenomenon called detonation and they had determined that excess air
space in
the cartridge case to be the trigger for detonation.
How
to figure load density.
Powder charge weight divided by case capacity equals load
density.
Example: Powder charge 40 grains (divided by) Case capacity 50 grains =
.8 or 80% load density.
Case
Capacity
Case capacity is the amount of volume inside a cartridge case
that is
available for the powder to fill.
How
To Measure Case Capacity.
Measuring case capacity is actually quite simple. Once you
have
established your bullet seating depth in the bullet section of this
guide.
1. Weigh one case with bullet seated to proper depth without powder or
primer.
2. Now fill the case with water through the primer hole using a
hypodermic
needle and weigh again.
3. Now subtract dry weight from the water weight and this will give you
your
case capacity.
Example:
470 grains = water weight with bullet.
- 420 grains = empty weight with bullet.
50 grain = case capacity.
Once
you have your case capacity using your reloading manual select powders
that
fall into your load density range.
In the above example of a 50 grain capacity your range would be.
a. 50 grain capacity x 80% load density = 40 grains of powder.
b. 50 grain capacity x 90% load density = 45 grains of powder.
Bullets
Today, bullet selection is excellent for reloaders who have
or train with
a wide diverse rifle shooting battery, varmint rifles, assault rifles,
tactical
rifles, big game rifles and target rifles each of which require top
notch
accuracy and superb bullet performance.
Bullet
Selection
a. Bullet selection determined by rifle twist rate for proper bullet
spin.
A good rule of thumb is that the heavier and longer a bullet
is, the
faster the twist rate needs to be to stabilize the bullet in flight,
therefore
a lighter shorter bullet needs a slower twist rate to give proper
bullet spin
for correct flight.
b.
Bullet selection determined by bullet construction.
Today, bullet manufacturers to stay on top of what the
shooting public
wants, offer bullets with different construction for different uses. A
good
example of this is the Hornady bullet line up which offers their V-MAX
for
varmints, SST for deer and larger game animals and the A-MAX for target
work
all of which are very accurate with high ballistic coeffecients.
Bullet
Precision
How does anyone really know how precise a bullet is? Well
short of
x-raying the bullet or using a juenke machine you don't, but you can
sort out
most bad bullets by weighing them on a very accurate scale.
While bullet manufacturers are very close today of creating perfect precise bullets the occasional bad bullet can be sorted out. Many reloaders still overlook the reloading value of the above scale for its accuracy and ease of use.
When weighing bullets seperate them in increments of 1/10 of a grain. The reason for doing this is that the bullets components when assembled can create slight air pockets or antimony differences depending on the bullets construction which will change the bullets overall weight.
Bullet
Seating Depth
Bullet seating depth has a great impact on rifle accuracy.
The bullet
seating depth for each individual rifle and bullet varies and should be
set
accorgingly.
NOTE: Do not use this procedure for rifles chambered for weatherby cartridges as these have long throats cut into the rifles bore.
Step 1. Insert a bullet into the neck of a unprimed resized case. Do not fully seat the bullet but seat it deep enough that it is gripped fully by the cartridge neck.
Step 2. Using a black magic marker or dykem steel layout blue, color the entire bullet.
Step 3. Insert the case and bullet into the chamber of the firearm and gently start to close the action. Stop as soon as you feel resistance.
Step 4. Remove the cartridge from the chamber, now look at the bullet, it should have well defined marks where the bullet contacted the rifling in the barrel.
Step 5. Continue seating the bullet deeper and chambering the cartridge until you only feel a slight amount of resistance when the bolt is closed completely. There should only be marks left on the bullet from the lands of the barrel.
Step 6. Now take another resized casing and with your bullet seating die set, repeat seating another bullet in the cartridge case to verify that this is your maximum cartridge length.
(NOTE) Never start working up a load with a bullet set against the lands in the barrel as this will sky rocket your load pressures.
Step 7. Shorten your cartridge maximum length by .06250" or 1/16" this is where you want to start to tune your load for seating depth.
(NOTE) Best overall accuracy, velocity, pressure uniformity and overall bullet performance will usually be obtained with most bullets seated from the barrels lands between .062" - .005".
Checking
Accuracy
Once you have loaded a round of ammunition for your rifle
there is one
final step that you can take that helps eliminate fliers before you go
to the
rifle range and that is checking bullet run-out.
Bullet
Run-Out Gauge
How the complete cartridge fits in the chamber and throat of the rifle
barrel
directly affects accuracy!
Bullet
Run-Out
Checking bullet run-out is nothing more than gauging the
accuracy of the
bullets alignment with the cartridge case. It is this one simple task
that can
make or break 1 inch groups or tiny 1 hole groups.
Bullet
Run-Out Usage
Once you have completed loading your cartridges and are ready
to check
the bullet run-out you have to establish what you are going to use your
loaded
ammunition for and separate them.
Example:
.000"
- .001" Sighting in and small varmint hunting.
.001"
- .002" Large varmint and general range shooting.
.002"
- .004" Big game hunting.
Load
Testing
1. Your rifles bore condition is critical at this point and
most
likely even though you keep it clean unless you use a good copper
solvent it is
almost without saying that your barrel is copper fouled beyond serious
accuracy
testing. (Bore Cleaning)
2. Scope mounting is also critical while most shooters know how to mount a scope very few know how to mount a scope for ultimate accuracy over extended range shooting. (Scope Mounting)
3. The next step in accurate load testing is a rock solid shooting platform. A shooting bench that is anchored to the ground is a must for any serious accuracy testing.
4. The next step after establishing a shooting platform in load testing is to have a good rifle rest to anchor your rifle, rifle rest bags are ok but the Outers Varminter adjustable rifle rest is more solid and accurate.
5. Target and targeting this is simply one of the most overlooked areas when reloaders are working up loads for accuracy load testing, simply put you need an accurate targeting system. Using our free target you put up the target using a level which will help eliminate scope and rifle canting on the rifle rest. This target has been made to align the crosshairs of your scope with the diamond shape points on the target.
Safety Note: Before testing any load you have worked up always wear ear and eye protection!
6. Once you are satisfied with testing the accuracy of your load the next step is to test the velocity of the load for trajectory purposes. The Alpha Chrony Chronograph gives 1-string, 32-shot memory (numbered). Measures high, low and average velocities, extreme spread and standard deviations. Stereo jack for optional remote control. Retrieval of individual shot velocity measurements. With a flip of the finger switch, from FPS to MPS and vice versa.
7. The last and final step in load testing. For those commercial loaders and handloaders interested in optimizing load performance as well as staying within industry recommended standards, Western Powders' ballistics lab is the place to start.
Western Powders' lab utilizes the piezoelectric transducer system recommended by SAAMI for all pressure testing. Pressure is read by a voltage meter and digital oscilloscope providing both the peak recorded pressure and the pressure curve trace. Projectile speed is recorded with a velocity meter and digital counter.
Western's pressure & velocity testing services are available to the commercial loader as well as the individual handloader. The cost for the testing of a 15 round load is $54.97. This cost includes the testing and printout report that is sent to the loader at the culmination of testing.
Bullet
Run-Out.
Bullet run out is the cause of most reloaded rifle cartridge
inaccuracies. Most rifle cartridge case and bullet alignment is
determined in
the resizing die but there are other reasons and situations that will
cause
excessive bullet run-out which are not readily seen with the human eye.
Bullet
Run-Out Depiction.
The below drawings are exaggerated for viewing and
demonstration purposes
of bullet run-out.
(a) .000" - .002" (b)
.003" - .004"
(b)
.003" - .004" (c)
.005" - .010"
(c)
.005" - .010"
In the above drawings depicting bullet run-out, if you have
worked up a
good load,
(a) will give groups under 1/2 inch in most cases,
(b) will give groups under 1 inch in most cases and
(c) will give groups between 1 1/2 inches - 2 1/2 inches.
Determining
or Diagnostic For Bullet Run-Out.
The above conditions will go unnoticed by most reloaders
because you have
to check bullet run-out with a accurate run-out gauge. If you go to the
range
and are consistently frustrated with group size and bullet flyers out
of a good
group and you have followed the steps in my accuracy guide read on.
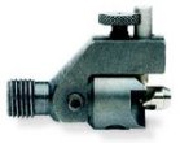
Gauging
Tool.
This tool is simplistic in design and easy to
use and a must for diagnosing
cartridge problems that are not readily seen by the human eye.
How the complete cartridge fits in the chamber and throat of
the rifle
barrel directly affects accuracy!
The Gauging Tool, measures
case
neck concentricity,
case
neck thickness,
case
length and
bullet
run-out.
Bullet Run Out Correction.
Bullet run-out correction begins right after the resizing die step of once fired cartridge cases in rifle cartridge reloading.
1.
Cartridge Case Resizing.
Once you have resized a once fired cartridge case the next
step is to
check case-neck run-out which should be less than .002".
Note: If you are working with new unfired brass do not try to
take
accurate run-out measurements other than bullet run-out as brass needs
fire
formed one time to give consistent true readings.
a. All cases that have more than .002" neck run-out should be set aside and checked for case neck thickness, if this is the problem the necks will have to be turned and trued.
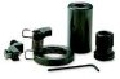 Case
Neck Turner w/Autofeed easily removes excessive neck thickness. The
Autofeed
attachment (for Case Trimmer-2 and Trim Pro) advances the cutting tool
over the
case neck with each turn of the trimmer handle.
Case
Neck Turner w/Autofeed easily removes excessive neck thickness. The
Autofeed
attachment (for Case Trimmer-2 and Trim Pro) advances the cutting tool
over the
case neck with each turn of the trimmer handle.
b. If your run-out is consistently more than .002" and case neck thickness is not the problem you should check to make sure that your resizing die is clean and properly set, if problem still persists a tighter tolerance resizing die should solve the problem. Lee standard dies have the tightest tolerance that I know of without going to a high dollar competition die.
c. At
this point you will realize that some brass cartridge casings are going
to have
to be weeded out and not used. With all work done at this point
separating
process should be as follows,
.000 super accurate,
.001 very accurate,
.002 accurate
and beyond .002 trash can.
2.
Trimming, Chamfering and Deburring.
The next very important step with the cartridge case to
minimize bullet
run-out is trimming, chamfering and deburring.
a. Trimming cases can be done by many different types of tools but the bottom line is the case mouth has to be cut true to facilitate the bullet seating operation minimizing bullet run-out.
Case
Full Length Trimming Depiction.
The below drawings are exaggerated for viewing and
demonstration purposes
of full length trimming.
(a) Trued Cut (b) Angled Bad Cut
In the above drawings (a) when properly chamfered and
deburred should
allow proper bullet seating, (b) when chamfered and deburred will not
allow the
bullet to be seated properly and cause bullet run-out.
b. Chamfering cases is normally done by hand with a hand tool and leads to a lot of bullet run-out problems. Chamfering cases needs to be done exactly the same on each and every case with machine like accuracy.
Case
Mouth Chamfering Depiction.
The below drawings are exaggerated for viewing and
demonstration purposes
of case mouth chamfering.
(a) Correct  (b)
Deep
(b)
Deep  (c)
Shallow
(c)
Shallow  (d)
Angled
(d)
Angled 
In the above drawings (a) properly chamfered should allow
proper bullet
seating, (b) chamfer to deep and will most likely leave slivers of
brass in
your rifles chamber causing accuracy problems, (c) chamfer to shallow
will most
likely shave copper from bullets causing accuracy problems and will
cause
bullet run-out, (d) angled cut will most definitely cause bullet
run-out.
c. Deburring cases is normally done by hand with a hand tool and can lead to some bullet run-out problems in certain bullet seating dies. Deburring case necks needs to be done exactly the same on each and every case with machine like accuracy.
Case
Neck Deburring Depiction.
The below drawings are exaggerated for viewing and
demonstration purposes
of case deburring.
(a) Correct (b)
Not Deburred
(b)
Not Deburred (c)
Angled Deburred
(c)
Angled Deburred 
In the above drawings (a) properly deburred will allow proper
bullet
guide and seating in all dies, (b) not deburred will have some effect
on bullet
seating in certain dies and will create accuracy problems inside the
rifle
chamber, (c) angle deburred will have some effect on bullet seating in
certain
dies and will create accuracy problems inside the rifle chamber.
 3-Way
Cutter.
3-Way
Cutter.
Trims, Chamfers & Deburrs with lathe like accuracy. Its unique
3-blade head
trims cases like a standard cutting tool, the inside blades chamfer the
case
while an outside blade deburrs it.
3.
Bullet Seating.
The bullet seating operation and bullet seating dies vary
between
manufacturer of these dies.
Classify bullet seating dies into
2 classes;
a. wobble dies (which is the accepted standard) and
b. bullet guided dies which are classed as (competition dies).
If
you have done everything correctly to this point as outlined above, the
accuracy you should expect to get is as follows;
a. wobble dies, bullet run-out should be less than .005",
b. competition dies bullet run-out should be less than .003".
a.
Standard bullet seating dies will seat bullets straight if the bullet
is set on
top of the piece of brass straight before you slowly lower the press
handle to
seat the bullet.
b. Competition bullet seating dies have a collar, collet and or guide
that
automatically guides the bullet into the piece of brass straight
reducing the
human error factor.
The differences between smokeless and black powder cartridge reloading.
Case Preparation:
Case prep is the same for a black powder cartridge, as for a
smokeless
cartridge. Prime with the same primers you would use if the cartridge
were to
be loaded with smokeless powder. Once the cases are cleaned, sized, and
primed,
they are ready to be charged with black powder.
Powder Charging:
When loading with black powder you must NEVER leave an air
gap between
the powder and projectile. Use a drop tube of about 24” length with a
funnel on
the top. The tube should fit just inside the cartridges mouth. You pour
the
powder down the tube into the cartridge. This allows proper settling of
the
powder charge.
Black powder cartridges were designed to hold the proper
amount of black
powder and the case will always be full, double charging is impossible.
Normally black powder is compressed a bit when the bullet is seated. So
you
subtract the seating depth of your bullet plus any wads you may be
using from
the length of the case, add in the amount of compression you plan on
using, and
this will give you the level to which you should fill the case with
black
powder.
Wads:
Next you must add wads, to separate powder from black powder
bullets and
lube.
Bullets:
Black Powder cast bullets should have large grease grooves to
hold ample
amounts of lube. Cast bullets for smokeless powder contains neither the
right
type of lubricant nor enough lubricant, so you will need to use cast
bullets
specifically designed for black powder.
Crimp:
Now that you have the proper bullet loaded with a good black
powder lube
seat the bullet and crimp in place. In revolvers and lever guns where
the
cartridge will be subjected to the shock of recoil a heavy crimp is
needed.