


This guide will help you schedule the planting of gardens so space may be used efficiently. Designed for the Midwestern states, dates for western states could be up to 4 weeks earlier.
Radishes—Several plantings, 7 to 10 days apart, are possible. Radishes pass peak quality quickly, so several plantings are needed to provide high quality radishes throughout the spring and early summer. Radishes become spongy and make seed heads readily with the onset of hot weather. Several fall plantings can be made in August and September.
Lettuce—Sow seeds in early spring. Lettuce flowers and turns bitter with the onset of hot weather. Fall plantings can be made in August.
Onions—Sow seeds as soon as the ground can be worked in spring for mature (storage) onions. Plant sets and transplants in spring.
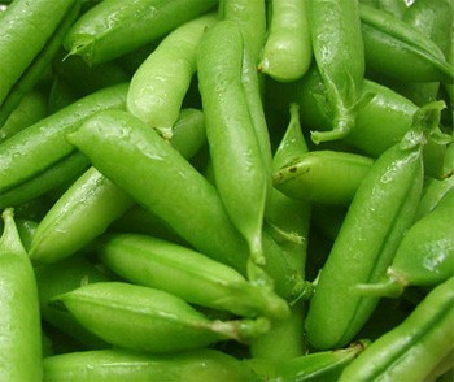
Peas—Sow seeds in early spring as soon as the soil can be worked. Plants stop bearing when hot weather arrives. A fall planting may be made about August 1 to 10.
Spinach—Sow seeds in early to mid-April. Leaves develop bitter flavor and plants make seed heads with the onset of hot weather. A fall crop may be planted about August 10.
Cabbages—Set out transplants any time from early April to mid-June. Early-maturing types may be planted in early August for fall crop.
Broccoli and cauliflower—Set out transplants in early to mid-April. Both are sensitive to hot weather so need to be encouraged to head as early as possible.
Collards and kale—Seed at the same time as lettuce and other early spring crops. Direct-seed in early July for a fall crop.
Carrots—Seed early or any time during spring and summer. Carrots seeded as late as August 1 may produce full sized roots by fall.
Beets and Swiss chard—Plant any time from spring to midsummer. Last practical planting date for fall crop is August 1.
Potatoes—Best planted in early to mid-April; a long growing season is needed to produce full-sized tubers
Turnips—Sow seeds in April and again in August or early September for a fall crop.
Snap beans—Plant any time after May 5. Most varieties will keep producing if they are kept picked. Last practical date for planting is August 1.
Lima beans—Plant from May 20 to June 30 to produce a crop by average frost date.
Sweet corn—Plant when soil temperature reaches 60°F or any time thereafter. Last practical date for planting an early variety is July 1.
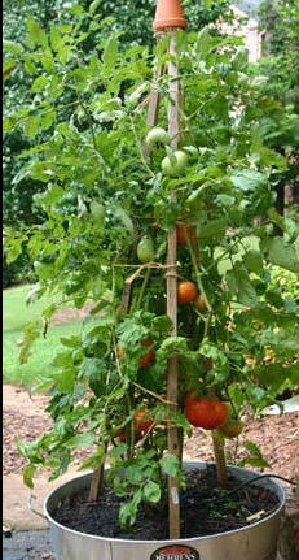
Tomatoes—Plant seedlings in mid-May. Last practical date for planting tomatoes is June 20.
Peppers and eggplants—Plant seedlings in mid-May. Last practical date for planting peppers and eggplants is June 20.
Summer squashes—Seed mid-May. If harvested every other day, plants will keep producing until frost. Last practical date for seeding is July 20.
Cucumbers—Seed mid-May. Production is continuous if kept picked. Last practical date for seeding is July 20.
Muskmelons—Seed mid-May. There are varietal differences in the length of time from planting to harvest. Last practical date to sow seeds of early maturing varieties is June 20.
Winter squashes and pumpkins—Seed mid-May. A full season is needed to produce mature fruit that will keep well into the winter.
Watermelons—Seed mid-May. There are varietal differences in the length of time from planting to harvest. Last practical date to sow seeds of an early maturing variety is June 20
Vegetables are easy to grow and are very rewarding at harvest time. The most important requirements are sunshine and watering. Other requirements are a loosened soil, some fertilizer, and a little bit of weeding. If you have an area in your yard that gets sunshine most of the day (6-8 hours in summer) then you can have a vegetable garden. The first time you start a new garden requires the most amount of work, but don’t get discouraged, the work you do in the beginning does not have to be done again each year.
The ground that the plants will grow in needs to be loosened up so that the roots of the tender vegetable plants can grow into your soil and make strong, healthy plants. The roots are the only way the plant takes up water and nutrients so you want to make their job easy. Unfortunately, soil found in most yards has become compacted over the years and can be as hard as concrete in summer. Therefore, the best time to dig your garden is early spring when it is moist enough to dig easily but not so wet that the soil is muddy and heavy. The first step is to mark out your spot making sure there are no trees or large shrubs around it with roots that will spread into your garden. Then, remove the grass and create some type of border around the garden to keep it neat and weed free. I also recommend a short fence if you have pets, as the garden can easily be mistaken for a large litter box.
You must dig your soil to loosen the clumps and allow air in, which will allow the roots to breathe (yes, they need air also). The depth that I recommend is at least 12". It seems like a lot when you are digging but keep in mind that your tomato plants will extend their roots approximately 2 feet down into the soil. I use a large digging fork and involve my whole family but a rototiller makes short work of it. Rakes also help in smoothing the soil out after the digging is done. You should add about 2" of compost at this point and mix it into the soil well. Do not add too much, 10-20% of the soil should be compost, but no more than that or you will over- fertilize your garden. When it looks like a good place to lie down and take a nap then you are ready to plant. You may also need Lime or Gypsum in your garden to correct the Ph. If you live in an area with lots of rainfall, add lime every year, about 1 pound per 100 sq. feet. If you have low rainfall amounts each year, you may need to add some Gypsum to new gardens to remove some of the salt content. Check with your local garden center for the correct amount.
Before you plant, you need to do some planning to allow enough room for the plants you want to grow. Plants generally get very large and you need to allow enough space for each one, or the plant will become stressed and may not produce good fruit. When you purchase them most plants will have information on how much room they will need when fully grown. A good rule of thumb is to allow 18-24" spacing for most plants. I recommend using a paper & pencil to draw the garden plan out. Always keep in mind that the sun will be important to all of the plants so put the tallest ones in the back so they do not shade the shorter ones.
Starting a Garden:
Digging the soil and turning it well to loosen it up is the first step. This can be done with a digging fork or a rototiller but careful not to over rototill as that can cause problems with drainage. The most important thing you can add to your garden is compost. Spreading a 1" layer of a good compost will add microorganisms and nutrients to your garden along with earthworms and good bacteria. They will do most of the work in your garden to break down the minerals and natural chemicals in your soil and allow the plants to take them up through their roots.
Planning a layout before you plant can help you discover problems before they happen such as shading and crowding. Check out our Garden Plans page for plant sizes and sun requirements to help you get organized. Always keep the lowest plants toward the South side and taller ones to the North. Don't overcrowd but if you live in an area with lots of dry summer heat you can plant a bit closer together than normal to help shade the ground and protect against drying out the soil.
Mulching after you plant is very necessary for hot dry parts of the country and wet moist places also. Mulches keep moisture in the soil, keep it cooler, and prevent fungus spores from splashing up onto your plants' leaves which causes diseases. Some great mulches are pine needles, dead leaves, hay straw, and even newspaper strips. These will also break down in the soil and add organic material to your soil for next year.
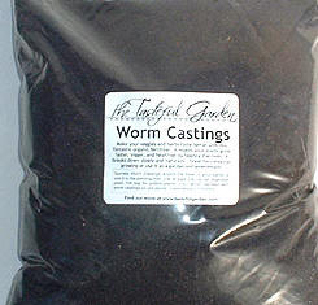
Fertilizing should be done as naturally as possible. Compost generally has some grass clippings in it which provide enough nitrogen for the whole season. If yours does not, you can add manures, or worm castings, (also available in our catalog) which make a wonderful fertilizer or you can use a store bought organic type fertilizer which has low numbers on the bag such as 6-4-2. Higher numbers on a bag of fertilizer do not mean that it is better for your plant. They can burn your plants and overfeed them and you will have no vegetables at all in your garden. We do not recommend Miracle Gro because of the the short term benefits to your garden. Miracle Gro washes away in a few days and leaves behind salty soil. You have to keep using it every week all summer which makes it expensive and it is really easy to overfeed and burn your plants.
The same situation goes for insect control. There are some really good mild organic treatments for pest control but before you use anything, know what you have and the best way to treat it. Sometimes this is as easy as clearing away a few weeds or adding a mulch. Many store bought pest controls can be very toxic to your plants, good bugs and you. Always read the package very carefully, organic doesn't always mean safe! Some products recommend are Safer soap, Bacillius Thurengiensis or BT, Neem spray and good old handpicking. Click on Insect Information for more help.
Garden Layout:
Vegetable
or herb gardening has become
much more popular in the United
States in the past 10 years. The focus has
been on growing more flavorful, nutritious, and fresher produce than can be
found in the local grocery store. Television cooking shows make our mouths
water with fresh herbs
Growing your own produce is easy and fun as well as more flavorful for your cooking. To get started, just go through these basic steps:
1. Choose a location. Ideal locations for kitchen gardening have some area of full sunshine for tomatoes, peppers and other fruiting vegetables as well as some areas that may be shaded in the afternoon for annual herbs such as basil and dill. Lettuces and other greens thrive where mid day heat is blocked by trees or large plants and herbs love the drainage that a raised bed provides. Soil conditions do not have to be perfect but good draining areas are always best and having your garden near the kitchen encourages you to harvest as you cook.
2. Plan a layout. Based upon what you think you will use the most, plan your kitchen garden with your needs in mind. When you are hungry is no time to plan your garden, just like at the grocery store there is a tendency to overdo. Try to grow just a few plants each of your favorite vegetables and herbs that you use most frequently. Avoid large items like watermelons and squashes, although they are easy to grow, you can be overrun with the size or quantity.
3. Organize the garden for working. Plan to have walkways and planting beds which are narrow enough for easily reaching to pick or pull weeds. Plan to have taller plants towards the back and shorter plants towards the front. Make sure your hose can reach all areas of the garden and avoid tree roots and other obstructions.
4. Work the soil. Adding compost is the most important thing you can do for your garden. Composted manures or leaves will add organic material which breaks down and improves the texture and nutrient content of your soil. Hard compacted ground will stunt root growth and prevent growth above ground as well. Rototillers and digging forks are the best for breaking up hard packed soil. Soil testing is necessary as Lime may be needed to correct the Ph in areas with heavy rainfall.
5. Containers can be great gardens. If you are limited on space or mobility, use large containers and plant combinations of herbs, vegetables and strawberries. Use deep containers for best results and always add compost to the potting soil you buy. Regular potting soil was designed for commercial greenhouses that water daily, adding compost helps retain water and nutrients for the roots. Organic or slow release fertilizers also help with keeping you from having to feed your containers weekly. Make sure you allow enough room for each plant to grow to about 2/3 of its normal size in a garden.
6. Plant good plants at the correct time. Make sure you are planting everything at the proper time for your area. Last frost dates are guidelines for tender vegetables such as tomatoes and peppers, but many cool season plants do best while nights are still nippy and cool. Herbs can be planted early but most will do best as the soil warms up in late spring. Basil is very cold tender and will not grow at all if night temps are below 42.Choosing healthy plants at their peak is key to good results.
7. Do not over water or over feed. If rainfall is regular (about every week or so) it may never be necessary to water. If you are having a very dry season or your area does not get much rainfall, use slow deep waterings of about 1 hour with a trickling hose or drip irrigation to get the water down deep. This will get the roots down low and provide a good strong root system.
Feeding should always be done with the motto that less is more. When plants are stressed from extreme heat or drought, feeding will not help them. Bugs may attack plants that are stressed but again, feeding does nothing to help. If you are not concerned with growing a 20 pound tomato, do not use quick feeds such as Miracle Gro. The best feed is an organic type which will slowly break down and feed as the plant requires it. A schedule of feeding every 6 weeks should be plenty.
8. Harvest frequently. Spend time with your garden and see what is happening to the plants on a daily basis if possible. It does them good and it is good for you too! Picking fruits and herbs often stimulates new growth and makes everyone happy.
9. Add a little more every year. Experiment with something new each season and try adding fruits or nuts, Asian or Italian types of produce such as Lemon grass or Arugula and spice up your kitchen garden for the best flavor possible.
Remember that no one is more of an expert than you are about the plants that you grow. Watching their progress will help you to understand their needs and the environment around them. Just because a bug is spotted in the garden, doesn’t mean that a catastrophe has occurred, there is likely a larger bug around the corner that wants to eat him! Always spray food plants with caution and make sure the product is approved for vegetables, don’t use Raid on something you are planning to eat. There are many organic type pesticides which are very safe not only for you but for those good bugs too.
Compost is the key to good garden soil and Mulch is a nice blanket that protects plants and keeps their roots moist and cool. For the best success, always add both every season to your garden beds and clean out debris to prevent bad insects from moving in to stay.
Here are some important ways to prevent these problems:
1. Use large containers. Keep in mind that the more root space the plant has, the better the roots will grow. This will allow the top part of the plant to grow large. Tomatoes can grow to over 6-8 feet tall and 2 feet across, a half whiskey barrel sized pot is just enough to accommodate the roots for that size plant. Small pots do make smaller plants but that also means a lot less fruit and many of the problems mentioned above.
2. Use compost in your pots too. You add compost to the ground when you plant, why not add it to the containers too? Compost is the best stuff for plants and it helps keep them cooler and moist during the summertime. Add about 25% or so to your potting soil mix. Mulch on top of the soil helps keep moisture in pots too.
3. Fertilizing regularly is very important.Use worm castings for this purpose because you can add it anytime and never overfeed. It works like compost and feeds too. As an alternative, it is highly recommend to use Osmocote for 6 months of feeding without thinking about it again. Our granular organic fertilizers are also very good and last about 6 weeks to 2 months before they need to be added again.
4. Never leave plants sitting in water. Trays under pots are dangerous because they hold water and can actually drown the roots of the plants by providing too much water. Dump them out frequently after rains. Good drain holes should be in every pot you plant in.
5. Make sure your plants get enough sunshine. Balconies and sun porches are great for growing plants but make sure there is sun at least 6 hours a day for vegetables to produce fruit well. Lettuces & Herbs will be satisfied with only 3-4 hours a day.
6. Too much heat can be detrimental to tomatoes. They will only set fruits when the temperatures are between 55-85 degrees and containers can heat up quickly in the summertime, especially if they are dark colored. Using pots that are too small, forgetting to water them or not mulching the soil will create a situation where the plants roots are just too hot for them to set tomatoes. They will blossom but the flowers will just fall off.
What you need:
All you need is a sunny, warm place and containers large enough for the plants you want to grow. Sunny decks, patios, and other areas are great for container gardening and do not require the difficult digging that starting a garden usually requires. Most vegetable plants will grow quite large so your containers must be large enough and not too crowded. Container gardening requires diligent watering and regular feeding, but it can be easy and fun for kids and adults. The main things you will need are:
For planting vegetables, you’ll need to allow approximately 18-24" in diameter for each plant. This includes tomatoes, eggplant , cucumbers, beans, squash, peppers and other large plants. These can be planted first and then you can add smaller vegetable plants such as onions, carrots, lettuces, or herbs around the bottom of the plant to fill in a large container.
First prepare your potting soil by filling the container and adding plant food according to the directions on the package for vegetables. Organic plant food or worm castings or slow release Osmocote pellets last for the entire growing season. Moisten the potting soil by adding water and mixing soil until it feels damp all the way through. Place the pot in the sun and you are ready to plant. Next, dig a hole large enough for the vegetable transplant, turn the plant upside down, tap the bottom, and gently pull the base of the stem until the plant comes out of the container. Place the plant in the hole and fill around the edges pressing gently. Water the plant immediately after planting.
Plants should get at least 6 hours of sunshine per day. They can grow with less, but they will not produce fruit in the shade. It is also very important to keep your plants watered regularly. Put your finger down into the soil approximately 2-3” deep and see if the soil is dry at that level. If it is, then water well until water runs out of the bottom of the pot.
You will need to stake or support plants such as tomatoes, beans, & cucumbers, tomato cages or bamboo stakes work well. Follow the directions on your fertilizer package for feeding vegetables. Check occasionally for bug damage and worms which can do serious damage to tomato plants. There are organic treatments if needed.
Pick
tomato fruits when they are almost completely red and finish ripening them on
your kitchen counter. Once they are soft and totally colored, slice
them immediately on to a sandwich and enjoy. Growing vegetables is easy and fun
and the payoff of harvest from your own garden is worth the wait.
The
Tasteful Garden promotes natural pest control methods such as
keeping your garden clean and weeded, using mulches and good compost in the
soil, and organically made pesticides only when absolutely necessary.We believe that
healthy, happy, plants will have a naturally immunity to pests and diseases and
in the long run can protect our environment from overuse of pesticides. 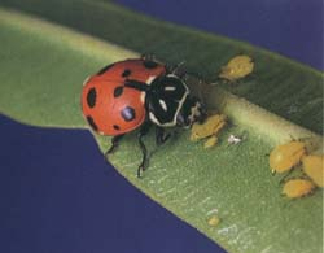
In many cases, when you see damage to the leaves of a vegetable plant, the
plant is not in danger of dying, only being nibbled on by an occasional insect. Other times, your plants can be literally eaten
away overnight by some hungry snails, cut off at the base by a cutworm, or dug
out of the ground by a squirrel. This can be heartbreaking when it happens but
keep in mind that we share the earth with these creatures and your garden looks
like a really great place to hang out! Most of the time, simple methods which
have been used for many years by gardeners are the best way to combat the
situation.
Below we have listed some of the more common pests for gardeners and the
easiest technique to get rid of one or two, as well as a more thorough way to
eliminate a full-on assault by these creatures.If you do use any type of
commercially bought pesticides, always make sure to read the directions
carefully and never use more than is recommended. Even organic pesticides can
be dangerous and can kill honeybees and birds if overused. Killing every insect
in your garden is not a good idea because many beneficial insects which eat
other pests can be killed and this can create a worse problem. There are also
many living creatures in the soil which help to break it down and provide
nutritious soil for your plants which can be killed such as earthworms and
bacteria.
Many diseases are spread by splashing water so water sprinklers and heavy rains
can create molds, fungus', and bacterial diseases which can make your plants
very unhappy and sometimes can kill them. Mulching with dried leaves, pine
straw, hay straw, grass clippings, newspaper, and even cardboard can make all
the difference in keeping diseases under control. They can also help hold in
moisture and protect from overheating the soil in the hot summer months. This
keeps plants happier and healthier and can prevent stressful conditions which
invite infestations of insects.
Organic gardening is done in the backyard by understanding that a healthy, happy plant, in
good, nutritious, soil helps prevent most diseases and harmful insect damage.
It is not necessary to kill every insect in the garden, as many pesticides do,
but it is important to keep your garden mulched, watered, weeded and clean of
debris to prevent problems. Read more about these insects below.
The
Tomato Hornworm is definitely the scariest pest in the garden, growing up to
5" long, they resemble something from a bad 70's movie. They are not
dangerous to people but to a tomato plant they are very heavy feeders and can
eat quite a lot of leaves. Female moths lay eggs under the leaves of the tomato
plant and once they hatch and start feeding they grow quickly. They eventually make their way into the
ground and stay until they become adult moths. Tilling in spring helps prevent
worms and moving your tomatoes each year can also help. 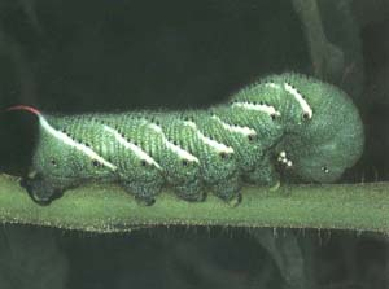 The best way to get rid
of them once you know you have a problem is to look for them at dusk when they
are most active. They can be very hard to find because of their coloring. They
leave black droppings behind and that can help with tracking them down. Usually
picking them off does the trick, just keep checking for new damage through the
season.
The best way to get rid
of them once you know you have a problem is to look for them at dusk when they
are most active. They can be very hard to find because of their coloring. They
leave black droppings behind and that can help with tracking them down. Usually
picking them off does the trick, just keep checking for new damage through the
season.
Many people use an organic product called Bacillus Thuringiensis, or BT, which
is a powder that you can spray on the underside of the leaves to kill the eggs.
It washes off quickly in rain and must be applied once a week.
The Cabbage Worm and Parsley worm can cause a lot of damage to leafy green plants and their holes are often mistakenly blamed on some type of flying bug.
The Cabbage Moth, the pretty white butterfly we see in our gardens couldn't possibly be causing any damage. Most of us think that a bug has to be ugly and black or green to be a "bad" bug. This butterfly can lay eggs on a plant and within a few days they are hatched and eating their weight in leaves every day.
The eggs of the Cabbage Moth


Watch carefully throughout the season for moths and as soon as you see them fluttering start looking for the eggs and worms. Picking them off usually keeps them under control, just keep checking for new damage throughout the season. Or, you can spray your plants organically, underneath the leaves, with Bacillus thuringiensis or "BT" to kill the hatching worms. It washes off in rain and must be applied once a week. Larger caterpillars can be squashed or if you prefer, killed with other organic insecticides like Neem II spray Just follow the directions on the package.
Slugs & Snails are not really bugs but they can be some
of the worst creatures in your garden. They are leaf and stem eaters and there
are certain plants they love to eat like Basil and leafy garden vegetables. They can
even 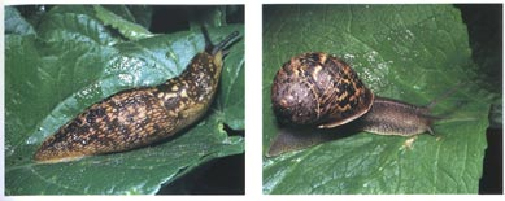 climb small citrus trees and eat the leaves and suck on the fruit. They
can eat their way through a young basil plant literally overnight and leave you
blaming the rabbits, squirrels or your dog. They eat all night long and hide in
dark, cool, damp places all day long. There are several ways of preventing
their damage and I will try to tell you which ones work and why.
climb small citrus trees and eat the leaves and suck on the fruit. They
can eat their way through a young basil plant literally overnight and leave you
blaming the rabbits, squirrels or your dog. They eat all night long and hide in
dark, cool, damp places all day long. There are several ways of preventing
their damage and I will try to tell you which ones work and why.
The most commonly used prevention is the slug and snail baits that are sold in garden centers. They
do work if you follow the directions on the box and replace them when it rains.
They contain Metaldehyde and as the snails eat it they will slowly die. Many
formulations can be dangerous to use around birds or pets and are not
labeled for use around edible plants. Fortunately there has been a new bait
developed called "Sluggo" that is safe around pets and will break
down into iron in the soil. It is pricey but good and very safe for use around
herbs and vegetables.
The best way to prevent snails and slugs is to create barriers that they cannot
cross over to get to your basil. Any type of copper can be used to make a wall
that electrically shocks their body (fun isn't it) or wood ashes, crushed egg
shells (easy and cheap), or diatomaceous earth which cut into their soft flesh.
Another thing that needs to be done is to try to eliminate as many of the
snails as you can find. You don't have to go out into the garden at night with
a flashlight. You can place boards out in the area propped up slightly and they
will hide there during the day. Go out in the afternoon and remove them from
the shady side of the board and destroy them. Follow their slime trails to
track down their hiding places. Beer traps work by drowning slugs but hardly
ever catch snails as they are not really beer drinkers.
Encourage natural enemies such as birds, toads, and salamanders, also chickens
and ducks are efficient snail hunters.
The Mexican Bean Beetle and the Japanese Beetleattack most
varieties of Bean plants as well as roses and many other plants, eating away at
the leaves until they look similar to lace. They can be very
destructive to bean 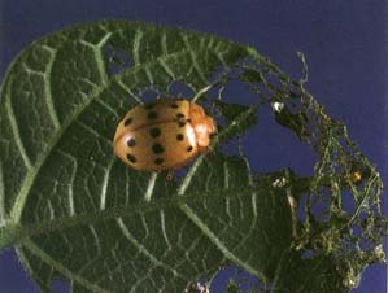 plants and the pods. They should be watched for around June
through August when the adults are most actively feeding. They start out yellow
or beige and develop their spots after reaching full adulthood. Check your
plants frequently under the leaves for egg sacks and remove them immediately.
If the damage is visible, lay a cloth under the plants and shake the stems
until the beetles fall off the plant. Collect them on the cloth and dispose of
them.
plants and the pods. They should be watched for around June
through August when the adults are most actively feeding. They start out yellow
or beige and develop their spots after reaching full adulthood. Check your
plants frequently under the leaves for egg sacks and remove them immediately.
If the damage is visible, lay a cloth under the plants and shake the stems
until the beetles fall off the plant. Collect them on the cloth and dispose of
them.
The best treatment for Japanese beetles is Milky Spore which is a bacterial
powder that kills only Japanese beetle grubs while they are feeding
underground in the Fall. See this product in our catalog for more information.
There are also organic sprays that can be used in cases of severe infestation
such as our Neem II spray. Always use all pesticides, even organic ones, as
directed on the bottle.
Whiteflies and Aphids will usually attack plants that are
under stress of some kind. Indoors, herbs are always under some kind of stress,
usually one of three things is the case. The first is not enough light (they
need about 4 hours a day), second could be that their pots are too
small for them (6" should be minimum size), third is too 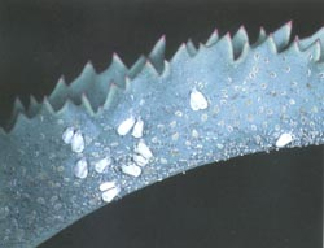 much watering
(never let your plants sit in a tray of water and don't water until the soil
feels dry to the touch). If you find that one or more of these is the problem,
do what you can to correct it first before you spray for the whiteflies.
much watering
(never let your plants sit in a tray of water and don't water until the soil
feels dry to the touch). If you find that one or more of these is the problem,
do what you can to correct it first before you spray for the whiteflies.
If that does not get rid of them, you can spray them with a little soapy water
(dish washing soap squirted into a spray bottle filled with water). Leave it on
for only a hour or so and then wash it off. You may need a couple of treatments
but it will get rid of them eventually. There is also an organic spray that is
called Neem II that is even better than the soap spray. It is made from Neem
oil and is combined with Pyrethrum from the Chrysanthemum plant, which works on
many types of insects as a deterrent and a killer.
HOW TO GET READY FOR FALL PLANTING
Before you can plant anything new, you should do a simple soil test to make sure the Ph is still up at above 6.0 If not, add 1 pound of lime per 100 square feet for each .5 below that number. Hydrated lime will work quickly to correct the Ph for fall vegetables. Remove all of the dead plants that are no longer producing fruit. Most can go into the compost pile but any plant material that had diseases or insect problems should be disposed of to avoid carry over to the next season.
Add an inch or two of good rich compost and rototill the beds but make sure to remove any weeds carefully so that seeds are not spread out all over your garden. Any portion of the garden that is not going to plant until next spring should be covered well with hay or black plastic or you can plant a cover crop of clover or rye grass to turn under in the spring for additional nitrogen.
What comes in, what goes out?
 Broccoli, Brussels
Sprouts, Spinach, Cauliflower, Peas, Lettuces and greens of all types can be
grown in the Fall. Most are frost tolerant and some can withstand freezes
and even snow on the ground. Cabbages can grow huge but live over until
early spring. All types of Salad greens can be planted and harvested at
various stages.
Broccoli, Brussels
Sprouts, Spinach, Cauliflower, Peas, Lettuces and greens of all types can be
grown in the Fall. Most are frost tolerant and some can withstand freezes
and even snow on the ground. Cabbages can grow huge but live over until
early spring. All types of Salad greens can be planted and harvested at
various stages.
Even Tomatoes and Bush beans can be grown in a fall garden by planting early varieties in July or August; they will be able to produce fruits before the first frost! Plus fried green tomatoes are a delicious way to finish off the leftover fruits. Many bush bean varieties take only 50-60 days to mature and Cherry and salad sized tomatoes can be ripe in 55-70 days. Try to avoid the large beefsteaks which take longer than 85-90 days to ripen.
Peppers
generally ripen in the south very quickly in our hot dry months of August and
September so leave them in the ground for as long as they are producing. Well
watered plants will continue
to fruit through the fall months. Peppers are also easy to freeze for storage
and are great flavorings for soups when the weather is colder. After Peppers
die back from the first frost, pull the plants out and set aside that area for
Potatoes in early spring. Cover the row with a heavy layer of hay straw to
begin to break down and lighten the soil.
Lettuces
and Greens are full of nutrition and thrive with cooler nights. Plant them
while it is still warm and watch them get larger as the temperatures drop.
Spinach, one of our favorites, can be grown in even the coldest areas, all
winter long with a covering of special lightweight fabric placed over the
plants. Carrots can also be grown during the fall 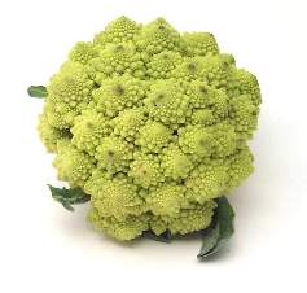 garden until you need them.
Garlic and Shallots are best started in the fall months, around September to mid October, and left to over winter. Spring will bring a harvest of huge bulbs ready to pull around late May to early June. Plant bunching or green onions in early fall and plan to harvest them in November leaving room for bulbing sweet onions to be planted in January - March.
Even if you do not plant fall vegetables it is a good idea to do the following steps to get your garden ready for next spring.
Growing Tips -- Fall Garden Conditioning
Preparing your garden for next year is very important. If done properly it allows you to use less chemical fertilizers and create a more loamy, light, soil with lots of microorganisms that will dig and digest organic material all winter long. This adds fertility to your garden that would have to be added in next spring at a slower and more expensive rate. For example, adding dead leaves to your garden makes for sweeter tomatoes next spring and provides better drainage at the same time. Here are some other mulching materials which can be added to your soil to improve the consistency and fertility:
 Dead Leaves (the more the better, pile them on!)
Old Hay straw (watch out for seeds in hay)
Compost from grass, kitchen and garden clippings (half dried and half green, not too much green stuff)
Worm Castings, good black compost made rich by worms
Pine needles (make sure you add lime to correct the Ph as these can make your soil more acidic)
Cottonseed meal
Egg shells (these add calcium which is needed by vegetables)
Manures (horse, cow, chicken or rabbit, no more than a inch or two depending upon the animal)
Green Manures**Green manure is actually just plants which grow well during the off season and dig down deeply with their roots, then are turned under in spring to breakdown before planting. This type of composting creates organic material in the soil, does deep digging for you, and can even add nitrogen if you use bean type (legume) plants. Red Clover and Annual Rye grass will grow in the winter months and when turned under, will release nitrogen as it breaks down.
Lime (to correct Ph in heavy rainfall areas, lime is almost always needed every year)
Most importantly, old gardeners know never to leave the soil uncovered for the weeds to take over and soil to compact. Use natures direction and get those raked leaves back into the soil or compost heap and out of those plastic bags!
Healthy and Nutritious, greens are really the easiest vegetables to grow. You can even grow them with only a half day of sunshine or in containers with fantastic results. No staking, no pruning, no fuss and no bother.
Arugula - Fast growing leafy greens for salads or pizza or pastas.
Beans and Peas - While not exactly winter crops, beans and peas love the cooler weather of fall and fast maturing varieties will grow and harvest before your first frost.
Beets - Easy to grow for the tops as greens or wait just 60 days and harvest the root for soups and stews.
Kale - Very nutritious leafy greens on huge plants that over-winter easily even in cold climates.
Collards - Another leafy green similar to kale but with larger, stronger flavored leaves.
Lettuces - Easy to grow in areas with milder winters, they will grow throughout the fall season and can be extended by covering with a light fabric.
Spinach - Delicious and sweet when the weather cools off, spinach will also grow through the winter under a light cover.
Bunching Green Onions - easy to grow and long lasting, you will harvest them similar to large chives.
Broccoli - Incredibly delicious when you grow your own. Broccoli grows a central flower head and continues with side shoots that can harvest after the main head is cut.
Cauliflower - Cauliflower planting must be timed well in order to develop large heads but they are sweet and delicious when grown fresh.
Mustard
- Spicy hot leaves, this is a very fast growing vegetable which can be
harvested quickly and eaten all
through November and into December.
Cabbage - Huge plants make good sized heads, watch for the number of days to maturity for best results.
Pac Choi - Perfect vegetable for fall production the stalks are tender and tasty.
Endive - Attractive frilly leaves with a slight peppery taste which can be braised or eaten in winter salads.
Swiss Chard - Very easy to grow and delicious to eat braised with a little garlic or in a soup or stew. Leaves can get quite large and will produce all winter long in mild areas.
Brussels sprouts - Best from transplants these are wonderful little cabbages to grow. Check days to maturity for best results in your growing area.